
Solar HVAC 4: PV/Thermal System Build
|
|
Share this page with your friends:
|
UPDATE 03/22/2017: this configuration has both exceeded my expectations for heat output, and disastrously failed because of it. The collector reached temperatures in excess of 100°C and damaged the PV panels. The system has been redesigned with the PV panels uncovered to keep them operating at a safe temperature. A cold climate air source heat pump is being incorporated with the array to test its efficiency when utilising the waste heat from the new PV panels during the winter months (in theory the higher the input air temperature is going into the outdoor coil, the less the compressor has to work and the less energy it will consume). During summer months, cool air from under the house will be directed through the outdoor coil to maximise heat exchange from inside to outside of the house for more efficient cooling. An automatic temperature and photosensitive switch will operate the required dampers for diverting the airflow when/were necessary. The PV array will also be cooled via a sprinkler system which will use the heated water for heating a swimming pool. The system will be finished over the next few weeks according to the new configuration, updates to follow in early November 2017.
Click here to view video of the damage to the collector
*ORIGINAL ARTICLE*
The build has started. If this is your first time here, check out the following links to view the research behind the development of this project:
HVAC 1: Desiccant Rotor Testing
HVAC 2: Combining Desiccant Dehumidification w/ Evaporative Cooling
HVAC 3: Testing Solar PV/T Configurations
I've decided to incorporate a solar air-water heat exchanger into the plan for a couple of reasons:
1 - with the solar gain from the large south facing windows in my house, I'll be producing around 35,000 btu/h on sunny days but will only need 20,000 btu/h. To prevent overheating the house and make use of the excess heat, I'll be using a heating/cooling thermostat controller with the cooling mode serving as the heat 'dump/diversion' mode; when the house reaches a comfortable temperature, the thermostat will switch to the cooling (or diversion) mode, which will switch the power between the two fans and ADR6 dampers to divert the excess heat through the air-water heat exchanger and contribute to DHW storage. When the house cools down and requires heat again, the thermostat will switch back to the direct space heating mode.
2 - This will also be great for utilising summer heat and keeping the collector from overheating when the evap. cooler/desiccant rotor aren't in use (refer to the links above for more information), which will help keep the cell efficiency from dropping, prolong the collector's life, and lower the payback period for the total investment even more.
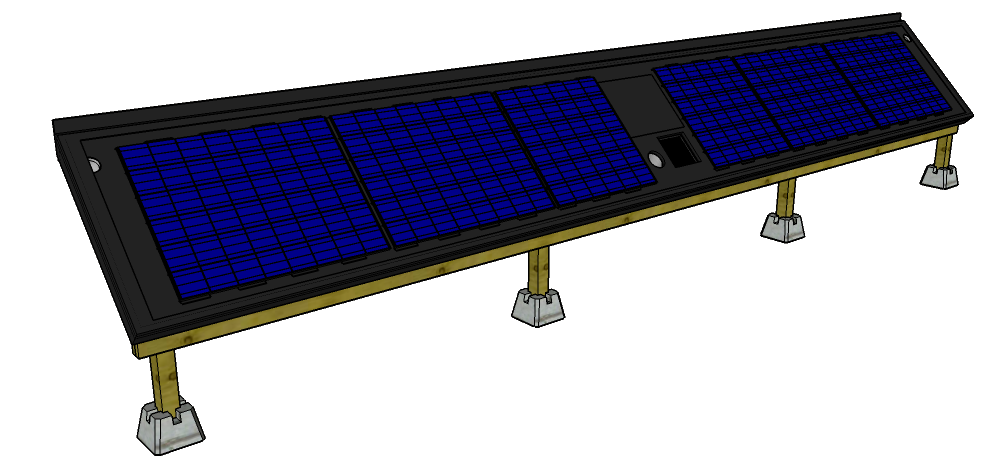
Below I've posted pics from the CAD to illustrate the system components and configuration. Video updates of the build will be posted as it progresses, performance data will follow. If you have any questions or comments about this project please feel free to share them in the comment section at the bottom of this page. Also check out the social media links above and 'like/subscribe' to keep up to date with the progress.
Click here to view video of the damage to the collector
*ORIGINAL ARTICLE*
The build has started. If this is your first time here, check out the following links to view the research behind the development of this project:
HVAC 1: Desiccant Rotor Testing
HVAC 2: Combining Desiccant Dehumidification w/ Evaporative Cooling
HVAC 3: Testing Solar PV/T Configurations
I've decided to incorporate a solar air-water heat exchanger into the plan for a couple of reasons:
1 - with the solar gain from the large south facing windows in my house, I'll be producing around 35,000 btu/h on sunny days but will only need 20,000 btu/h. To prevent overheating the house and make use of the excess heat, I'll be using a heating/cooling thermostat controller with the cooling mode serving as the heat 'dump/diversion' mode; when the house reaches a comfortable temperature, the thermostat will switch to the cooling (or diversion) mode, which will switch the power between the two fans and ADR6 dampers to divert the excess heat through the air-water heat exchanger and contribute to DHW storage. When the house cools down and requires heat again, the thermostat will switch back to the direct space heating mode.
2 - This will also be great for utilising summer heat and keeping the collector from overheating when the evap. cooler/desiccant rotor aren't in use (refer to the links above for more information), which will help keep the cell efficiency from dropping, prolong the collector's life, and lower the payback period for the total investment even more.
Below I've posted pics from the CAD to illustrate the system components and configuration. Video updates of the build will be posted as it progresses, performance data will follow. If you have any questions or comments about this project please feel free to share them in the comment section at the bottom of this page. Also check out the social media links above and 'like/subscribe' to keep up to date with the progress.
|
System Specifications
Power output potential: 1.1 kWp photovoltaics/ ~20 kBtu thermal (7 kWp) Electrical energy input: 110 VAC/~50 W Total collector area: 112 ft^2 PV: 0.5 V/8 A, 6"x6" monocrystalline, 264 pcs, 14% eff. Airflow: ~300 cfm Storage: 24 V, 245 Ah/5.9 kWh @ 50% cap. lead acid battery bank, 40 gal. DHW tank Control: 100 V/20 A MPPT controllers, 5 kW/20 kWp low frequency 24 VDC-110 VAC pure sine wave power inverter, digital multi-mode heating/cooling thermostats, ARD6 automatic motorised dampers w/ spring return |
Latest video upload:
Click the links below to view previous uploads in this series:
Part 1: The Collector Panels Part 2: The Rack Part 3: Change Of Plans Part 4: Encapsulating Panels W/ A Heat Bed Part 5: The Plenum |